Portainer Documentation
Official WebsiteKnowledge BasePricingGet 3 Nodes of BE Free
2.21 LTS
2.21 LTS
  • Welcome
  • What's new in version 2.21
  • Release Notes
  • Getting Started
    • Introduction
    • Portainer architecture
    • Lifecycle policy
    • Requirements and prerequisites
    • Install Portainer BE
      • Set up a new Portainer BE Server installation
        • Docker Standalone
          • Install Portainer BE with Docker on Linux
          • Install Portainer BE with Docker on WSL / Docker Desktop
          • Install Portainer BE with Docker on Windows Container Service
        • Docker Swarm
          • Install Portainer BE with Docker Swarm on Linux
          • Install Portainer BE with Docker Swarm on WSL / Docker Desktop
          • Install Portainer BE with Docker Swarm on Windows Container Service
        • Kubernetes
          • Install Portainer BE on your Kubernetes environment
          • Install Portainer BE with Kubernetes on WSL / Docker Desktop
        • Initial setup
    • Install Portainer CE
      • Set up a new Portainer CE Server installation
        • Docker Standalone
          • Install Portainer CE with Docker on Linux
          • Install Portainer CE with Docker on WSL / Docker Desktop
          • Install Portainer CE with Docker on Windows Container Service
        • Docker Swarm
          • Install Portainer CE with Docker Swarm on Linux
          • Install Portainer CE with Docker Swarm on WSL / Docker Desktop
          • Install Portainer CE with Docker Swarm on Windows Container Service
        • Kubernetes
          • Install Portainer CE on your Kubernetes environment
          • Install Portainer CE with Kubernetes on WSL / Docker Desktop
        • Initial setup
    • Add an environment to an existing installation
    • Updating Portainer
      • Updating on Docker Standalone
      • Updating on Docker Swarm
      • Updating on Kubernetes
      • Updating on Nomad
      • Updating the Edge Agent
      • Updating from Portainer 1.x
      • Switching to Portainer Business Edition
        • Upgrade to Business Edition from within Portainer Community Edition
        • Docker Standalone
        • Docker Swarm
        • Kubernetes
        • Upgrading Agent-only deployments
  • Using Portainer
    • Home
      • Snapshot browsing
      • OpenAMT
    • Docker/Swarm
      • Dashboard
      • Templates
        • Application
        • Custom templates
        • Deploy a stack
        • Deploy a container
      • Stacks
        • Add a new stack
        • Inspect or edit a stack
        • Create a template from a deployed stack
        • Webhooks
        • Migrate or duplicate a stack
        • Remove a stack
      • Services
        • Add a new service
        • Configure service options
        • Scale a service
        • View the status of a service task
        • View service logs
        • Roll back a service
        • Webhooks
      • Containers
        • Add a new container
        • View a container's details
        • Inspect a container
        • Edit or duplicate a container
        • Advanced container settings
        • Webhooks
        • Attach a volume to a container
        • View container logs
        • View container statistics
        • Access a container's console
        • Change container ownership
        • Remove a container
      • Images
        • Pull an image
        • Build a new image
        • Import an image
        • Export an image
      • Networks
        • Add a new network
        • Remove a network
      • Volumes
        • Add a new volume
        • Browse a volume
        • Remove a volume
      • Configs
        • Add a new config
        • Remove a config
      • Secrets
        • Add a new secret
        • Remove a secret
      • Events
      • Host
        • Details
        • Setup
        • Registries
      • Swarm
        • Details
        • Cluster visualizer
        • Setup
        • Registries
    • Kubernetes
      • Dashboard
      • kubectl shell
      • Kubeconfig
      • Custom Templates
        • Add a new custom template
        • Edit a custom template
        • Remove a custom template
      • Namespaces
        • Add a new namespace
        • Manage a namespace
        • Manage access to a namespace
        • Remove a namespace
      • Helm
      • Applications
        • Add a new application using a form
        • Add a new application using a manifest
        • Inspect an application
        • Inspect a Helm application
        • Edit an application
        • Webhooks
        • Detach a volume from an application
        • Remove an application
      • Networking
        • Services
        • Ingresses
          • Add an Ingress manually
          • Add an Ingress using a manifest
          • Remove an Ingress
      • ConfigMaps & Secrets
        • Add a ConfigMap
        • Add a Secret
      • Volumes
        • Inspect a volume
        • Remove a volume
      • More Resources
        • Service Accounts
        • Cluster Roles
        • Roles
      • Cluster
        • Details
        • Inspect a node
        • Setup
        • Security constraints
        • Registries
    • Azure ACI
      • Dashboard
      • Container instances
        • Add a new container
        • Remove a container
    • Nomad
    • Edge Compute
      • Edge Groups
      • Edge Stacks
        • Add a new Edge Stack
      • Edge Jobs
      • Edge Configurations
      • Waiting Room
      • Edge Templates
        • Application
        • Custom
    • Account settings
  • Administering Portainer
    • User-related
      • Users
      • Add a new user
      • Turn a user into an administrator
      • Reset a user's password
      • Teams
        • Add a new team
        • Add a user to a team
      • Roles
    • Environment-related
      • Environments
      • Add a new environment
        • Add a local environment
        • Add a Docker Standalone environment
          • Install Portainer Agent on Docker Standalone
          • Connect to the Docker API
          • Connect to the Docker Socket
          • Install Edge Agent Standard on Docker Standalone
          • Install Edge Agent Async on Docker Standalone
        • Add a Docker Swarm environment
          • Install Portainer Agent on Docker Swarm
          • Connect to the Docker API
          • Connect to the Docker Socket
          • Install Edge Agent Standard on Docker Swarm
          • Install Edge Agent Async on Docker Swarm
        • Add a Kubernetes environment
          • Install Portainer Agent on your Kubernetes environment
          • Install Edge Agent Standard on Kubernetes
          • Install Edge Agent Async on Kubernetes
          • Import an existing Kubernetes environment
        • Add an ACI environment
        • Add a Nomad environment
        • Provision KaaS Cluster
          • Civo
          • Akamai Connected Cloud
          • DigitalOcean
          • Google Cloud
          • AWS
          • Azure
        • Create a Kubernetes cluster
          • MicroK8s
            • Offline installation
        • Add an environment via the Portainer API
      • Auto onboarding
      • Groups
      • Tags
      • Manage access to environments
      • Manage access to environment groups
      • Update & Rollback
    • Registries
      • Add a new registry
        • Add a DockerHub account
        • Add an AWS ECR registry
        • Add a Quay.io registry
        • Add a ProGet registry
        • Add an Azure registry
        • Add a Gitlab registry
        • Add a GitHub registry
        • Add a custom registry
      • Browse a registry
      • Manage a registry
    • Licenses
    • Logs
      • Authentication
      • Activity
    • Notifications
    • Settings
      • General
      • Authentication
        • Authenticate via LDAP
        • Authenticate via Active Directory
        • Authenticate via OAuth
      • Shared credentials
        • Add Civo credentials
        • Add Akamai Connected Cloud credentials
        • Add DigitalOcean credentials
        • Add Google Cloud credentials
        • Add AWS credentials
        • Add Azure credentials
        • Add SSH credentials
      • Edge Compute
  • Frequently Asked Questions
    • Portainer Concepts
    • Installing
    • Upgrading
    • Troubleshooting
    • Contributing
  • Advanced Topics
    • CLI configuration options
    • App templates
      • Build and host your own app templates
      • App template JSON format
    • The Portainer Edge Agent
    • Access control
    • Reset the admin user's password
    • Security and compliance
    • Encrypting the Portainer database
    • Using your own SSL certificate with Portainer
    • Using mTLS with Portainer
    • Stream auth and activity logs to an external provider
    • Using Portainer with reverse proxies
      • Deploying Portainer behind Traefik Proxy
      • Deploying Portainer behind nginx reverse proxy
    • How Relative Path Support works in Portainer
    • Helm chart configuration options
    • Docker roles and permissions
    • Kubernetes roles and bindings
    • Deprecated and removed features
  • API
    • Accessing the Portainer API
    • API documentation
    • API usage examples
  • Get More Help
    • Knowledge Base
    • Portainer Academy
    • YouTube
    • GitHub
    • Slack
    • Discord
    • Open a support request
  • Contribute to Portainer
    • Contribute
    • Build instructions
      • Set up a macOS build environment
      • Set up a Linux build environment
Powered by GitBook
On this page
  • Command & logging
  • Volumes
  • Network
  • Env
  • Labels
  • Restart policy
  • Runtime & Resources
  • Runtime
  • GPU
  • Resources
  • Capabilities

Was this helpful?

Edit on GitHub
  1. Using Portainer
  2. Docker/Swarm
  3. Containers

Advanced container settings

PreviousEdit or duplicate a containerNextWebhooks

Was this helpful?

When creating or editing a container you can configure a number of additional settings in the Advanced container settings section.
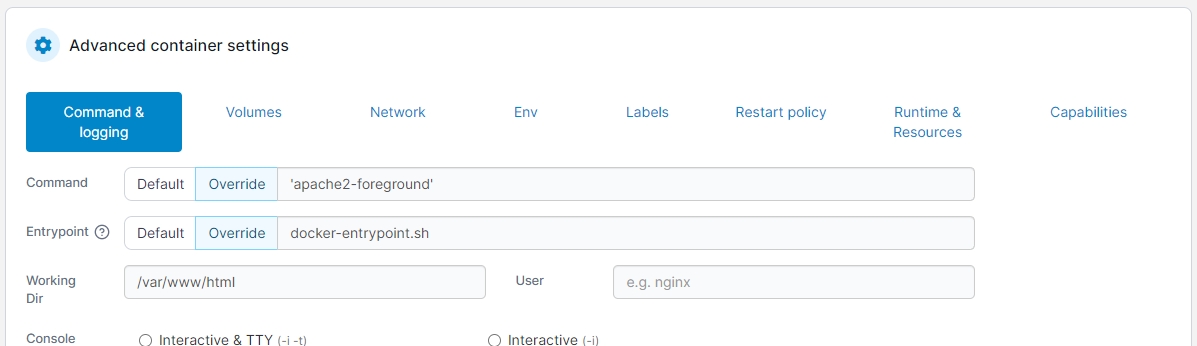
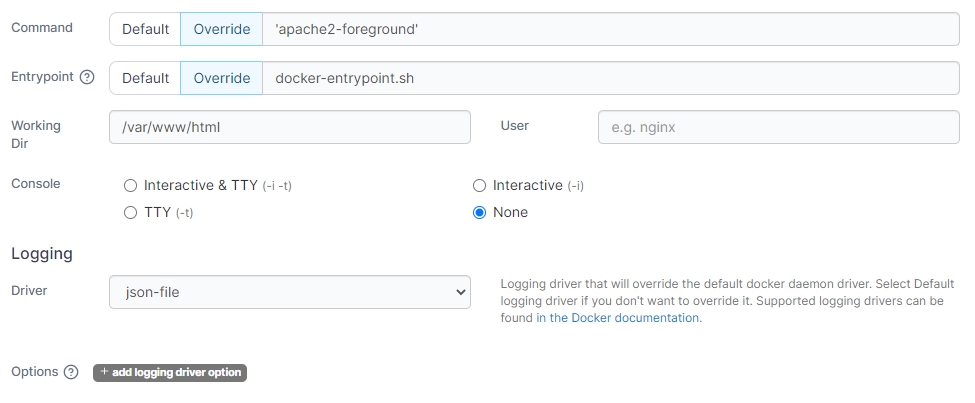
Command & logging

In this section you can configure the command that runs when the container starts as well as configure logging for the container.

Field/Option
Overview

Command

Set the command that is run when the container starts. Select Default to use the default command provided by the container's image, or select Override and provide a command to override the default value.

Entrypoint

Set the entrypoint for the container. Select Default to use the default entrypoint provided by the container's image, or select Override and provide an entrypoint to override the default value.

Working Dir

Set the working directory your container should start in (within the container's filesystem).

User

Specify the user that the container's command should run as.

Console

Set the console configuration for your container.

Driver

Select the logging driver to use for your container. Available options will depend on the logging drivers configured on your Docker host.

Options

Set additional options for your logging driver. To add a new option click add logging driver option and configure accordingly.
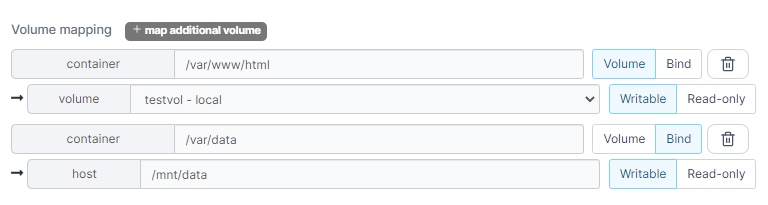
Volumes

Here you can configure volume mappings for your container. You can map to existing named volumes or bind mount to locations on your Docker host.

Field/Option
Overview

Container path

Specify where you want to make the volume or bind mount available within the container's filesystem.

Mapping type

Select Volume to map a named volume, or select Bind to map a bind mount.

Volume

If using the Volume mapping type, select the named volume to mount from the dropdown.

Host path

If using the Bind mapping type, specify the path on the Docker host you want to bind mount in the container.

Writable / Read-only

Select Writable if you want the container to be able to write to the mapping. Select Read-only if the container should not be able to write to the mapping.
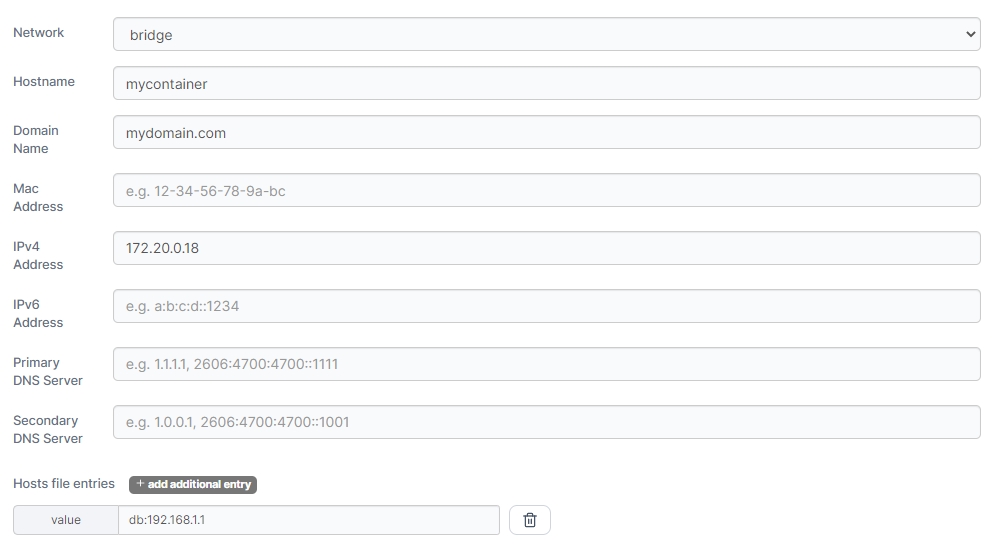
Network

In this section you can configure the network settings for the container.

Note that you cannot assign a static IP address to a container that is in Docker's default bridge network. This is a Docker limitation rather than Portainer. If you need to specify the IP for your container then you will need to create a custom network and assign the container to it.

Field/Option
Overview

Network

Select the network to attach the container to from the dropdown.

Hostname

Specify the hostname for the container.

Domain Name

Specify the domain name for the container.

Mac Address

Specify the MAC address to set on the container.

IPv4 Address

Specify the IPv4 address to use for the container. This must be within the range for the chosen network and should not be already assigned to a container.

IPv6 Address

Specify the IPv6 address to use for the container. This must be within the range for the chosen network and should not be already assigned to a container.

Primary DNS Server

Specify the primary DNS server to use within the container.

Secondary DNS Server

Specify the secondary DNS server to use within the container.

Hosts file entries

Click add additional entry to add a new host file entry for the container. Host file values should be formatted as hostname:address (for example database:192.168.1.1).

Env

Use this section to add or edit environment variables made available in the container. Click Add an environment variable to create a new variable, or edit an existing variable with the fields provided. You can also click Load variables from .env file to import an existing .env file with your variables. To remove a variable, click the trash can icon to the right of the variable to remove.

Field/Option
Overview

Name

Set the name for the environment variable.

Value

Set the value for the environment variable.

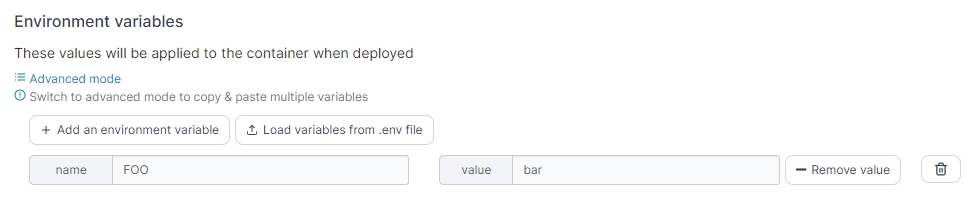
If you want to add multiple variables at once, click on Advanced mode to switch to an editor view where you can paste a block of variables and values.

Labels

You can set labels on your container using this section. Click add label to add a new label, or edit an existing label using the fields provided. To remove a label, click the trash can icon to the right of the label to remove.

Field/Option
Overview

Name

Set the name for the label.

Value

Set the value for the label.

Restart policy

Use this section to configure the restart policy for your container. Possible options are:

  • Never: Do not automatically restart the container when it exits. This is the default.

  • Always: Always restart the container regardless of the exit status. When you specify always, Docker will try to restart the container indefinitely. The container will also always start on Docker startup, regardless of the current state of the container.

  • On failure: Restart only if the container exits with a non-zero exit status.

  • Unless stopped: Always restart the container regardless of the exit status, including on Docker startup, except if the container was put into a stopped state before Docker was stopped.

Runtime & Resources

This section lets you configure runtime options for your container, add or configure GPUs for use within the container, and specify resource limitations on the container.
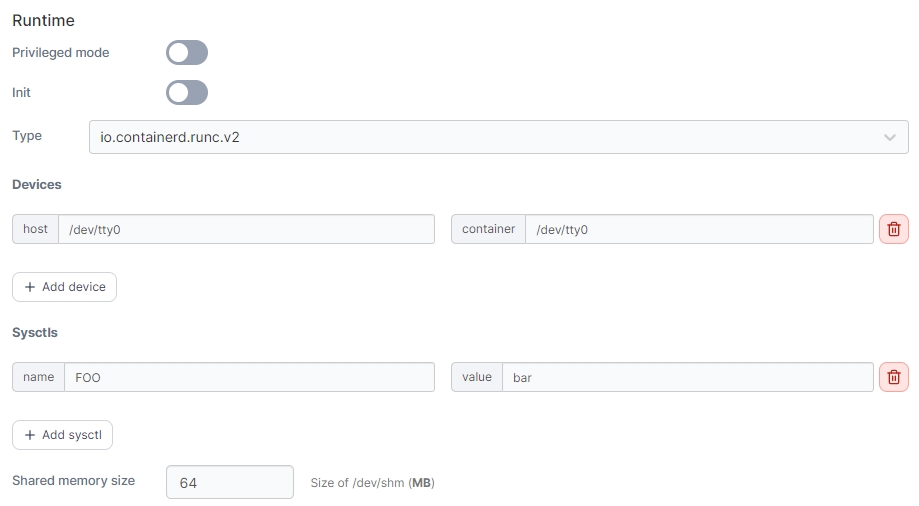
Runtime

Here you can configure runtime options for the container.

Field/Option
Overview

Privileged mode

Enable this option to run the container in privileged mode.

Init

Enable this option to tell Docker that an init process should be used as PID 1 in the container.

Type

Select the runtime type to use to start the container. Options will depend on available runtimes on your Docker host.

Devices

Use this option to make devices on your Docker host available within the container. Click add device to add a new device, and define the host path for the device and the container path for where you want the device to appear within the container.

Sysctls

Use this option to specify sysctls to make available within the container. Click add sysctl to add a new sysctl, and set the name and value for your sysctl as required.

Shared memory size

Specify the size (in MB) of the shared memory device (/dev/shm) for the container.

GPU

Here you can enable GPU access for the container and configure the GPU settings as required.

GPU support is currently only available on Docker Standalone environments, and only supports NVIDIA GPUs.

Field/Option
Overview

Enable GPU

Toggle this option on to enable GPU access for the container.

GPU selector

Select the GPU(s) to make available to the container, or choose Use All GPUs to provide access to all the GPUs on the Docker host.
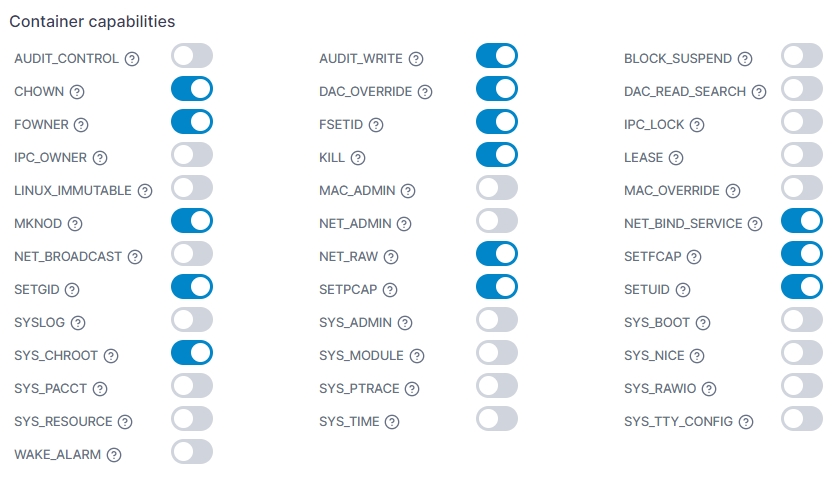
Capabilities

Select the capabilities you want to use with the container. Portainer preselects compute and utility as they are the defaults when not specifying capabilities.

Control

View a generated equivalent of the Docker CLI's --gpus option based on your selections above.
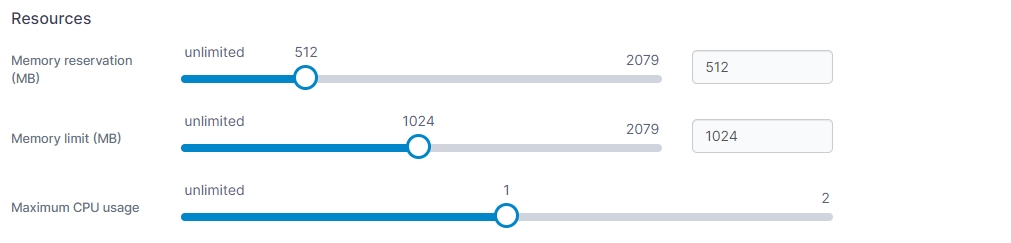
Resources

Here you can configure resource limits for your container. You can use the sliders to set the value or enter a value in the fields.

Field/Option
Overview

Memory reservation (MB)

Specify the amount of memory (in MB) to reserve for the container.

Memory limit (MB)

Specify the maximum amount of memory (in MB) the container is allowed to use.

Maximum CPU usage

Specify the maximum amount of CPU the container is allowed to use. This is specified based on the number of processing threads available on your Docker host.

Capabilities

In this section you can configure the individual capabilities for your container. For more information refer to the Docker documentation.