Portainer Documentation
Official WebsiteKnowledge BasePricingGet 3 Nodes of BE Free
2.21 LTS
2.21 LTS
  • Welcome
  • What's new in version 2.21
  • Release Notes
  • Getting Started
    • Introduction
    • Portainer architecture
    • Lifecycle policy
    • Requirements and prerequisites
    • Install Portainer BE
      • Set up a new Portainer BE Server installation
        • Docker Standalone
          • Install Portainer BE with Docker on Linux
          • Install Portainer BE with Docker on WSL / Docker Desktop
          • Install Portainer BE with Docker on Windows Container Service
        • Docker Swarm
          • Install Portainer BE with Docker Swarm on Linux
          • Install Portainer BE with Docker Swarm on WSL / Docker Desktop
          • Install Portainer BE with Docker Swarm on Windows Container Service
        • Kubernetes
          • Install Portainer BE on your Kubernetes environment
          • Install Portainer BE with Kubernetes on WSL / Docker Desktop
        • Initial setup
    • Install Portainer CE
      • Set up a new Portainer CE Server installation
        • Docker Standalone
          • Install Portainer CE with Docker on Linux
          • Install Portainer CE with Docker on WSL / Docker Desktop
          • Install Portainer CE with Docker on Windows Container Service
        • Docker Swarm
          • Install Portainer CE with Docker Swarm on Linux
          • Install Portainer CE with Docker Swarm on WSL / Docker Desktop
          • Install Portainer CE with Docker Swarm on Windows Container Service
        • Kubernetes
          • Install Portainer CE on your Kubernetes environment
          • Install Portainer CE with Kubernetes on WSL / Docker Desktop
        • Initial setup
    • Add an environment to an existing installation
    • Updating Portainer
      • Updating on Docker Standalone
      • Updating on Docker Swarm
      • Updating on Kubernetes
      • Updating on Nomad
      • Updating the Edge Agent
      • Updating from Portainer 1.x
      • Switching to Portainer Business Edition
        • Upgrade to Business Edition from within Portainer Community Edition
        • Docker Standalone
        • Docker Swarm
        • Kubernetes
        • Upgrading Agent-only deployments
  • Using Portainer
    • Home
      • Snapshot browsing
      • OpenAMT
    • Docker/Swarm
      • Dashboard
      • Templates
        • Application
        • Custom templates
        • Deploy a stack
        • Deploy a container
      • Stacks
        • Add a new stack
        • Inspect or edit a stack
        • Create a template from a deployed stack
        • Webhooks
        • Migrate or duplicate a stack
        • Remove a stack
      • Services
        • Add a new service
        • Configure service options
        • Scale a service
        • View the status of a service task
        • View service logs
        • Roll back a service
        • Webhooks
      • Containers
        • Add a new container
        • View a container's details
        • Inspect a container
        • Edit or duplicate a container
        • Advanced container settings
        • Webhooks
        • Attach a volume to a container
        • View container logs
        • View container statistics
        • Access a container's console
        • Change container ownership
        • Remove a container
      • Images
        • Pull an image
        • Build a new image
        • Import an image
        • Export an image
      • Networks
        • Add a new network
        • Remove a network
      • Volumes
        • Add a new volume
        • Browse a volume
        • Remove a volume
      • Configs
        • Add a new config
        • Remove a config
      • Secrets
        • Add a new secret
        • Remove a secret
      • Events
      • Host
        • Details
        • Setup
        • Registries
      • Swarm
        • Details
        • Cluster visualizer
        • Setup
        • Registries
    • Kubernetes
      • Dashboard
      • kubectl shell
      • Kubeconfig
      • Custom Templates
        • Add a new custom template
        • Edit a custom template
        • Remove a custom template
      • Namespaces
        • Add a new namespace
        • Manage a namespace
        • Manage access to a namespace
        • Remove a namespace
      • Helm
      • Applications
        • Add a new application using a form
        • Add a new application using a manifest
        • Inspect an application
        • Inspect a Helm application
        • Edit an application
        • Webhooks
        • Detach a volume from an application
        • Remove an application
      • Networking
        • Services
        • Ingresses
          • Add an Ingress manually
          • Add an Ingress using a manifest
          • Remove an Ingress
      • ConfigMaps & Secrets
        • Add a ConfigMap
        • Add a Secret
      • Volumes
        • Inspect a volume
        • Remove a volume
      • More Resources
        • Service Accounts
        • Cluster Roles
        • Roles
      • Cluster
        • Details
        • Inspect a node
        • Setup
        • Security constraints
        • Registries
    • Azure ACI
      • Dashboard
      • Container instances
        • Add a new container
        • Remove a container
    • Nomad
    • Edge Compute
      • Edge Groups
      • Edge Stacks
        • Add a new Edge Stack
      • Edge Jobs
      • Edge Configurations
      • Waiting Room
      • Edge Templates
        • Application
        • Custom
    • Account settings
  • Administering Portainer
    • User-related
      • Users
      • Add a new user
      • Turn a user into an administrator
      • Reset a user's password
      • Teams
        • Add a new team
        • Add a user to a team
      • Roles
    • Environment-related
      • Environments
      • Add a new environment
        • Add a local environment
        • Add a Docker Standalone environment
          • Install Portainer Agent on Docker Standalone
          • Connect to the Docker API
          • Connect to the Docker Socket
          • Install Edge Agent Standard on Docker Standalone
          • Install Edge Agent Async on Docker Standalone
        • Add a Docker Swarm environment
          • Install Portainer Agent on Docker Swarm
          • Connect to the Docker API
          • Connect to the Docker Socket
          • Install Edge Agent Standard on Docker Swarm
          • Install Edge Agent Async on Docker Swarm
        • Add a Kubernetes environment
          • Install Portainer Agent on your Kubernetes environment
          • Install Edge Agent Standard on Kubernetes
          • Install Edge Agent Async on Kubernetes
          • Import an existing Kubernetes environment
        • Add an ACI environment
        • Add a Nomad environment
        • Provision KaaS Cluster
          • Civo
          • Akamai Connected Cloud
          • DigitalOcean
          • Google Cloud
          • AWS
          • Azure
        • Create a Kubernetes cluster
          • MicroK8s
            • Offline installation
        • Add an environment via the Portainer API
      • Auto onboarding
      • Groups
      • Tags
      • Manage access to environments
      • Manage access to environment groups
      • Update & Rollback
    • Registries
      • Add a new registry
        • Add a DockerHub account
        • Add an AWS ECR registry
        • Add a Quay.io registry
        • Add a ProGet registry
        • Add an Azure registry
        • Add a Gitlab registry
        • Add a GitHub registry
        • Add a custom registry
      • Browse a registry
      • Manage a registry
    • Licenses
    • Logs
      • Authentication
      • Activity
    • Notifications
    • Settings
      • General
      • Authentication
        • Authenticate via LDAP
        • Authenticate via Active Directory
        • Authenticate via OAuth
      • Shared credentials
        • Add Civo credentials
        • Add Akamai Connected Cloud credentials
        • Add DigitalOcean credentials
        • Add Google Cloud credentials
        • Add AWS credentials
        • Add Azure credentials
        • Add SSH credentials
      • Edge Compute
  • Frequently Asked Questions
    • Portainer Concepts
    • Installing
    • Upgrading
    • Troubleshooting
    • Contributing
  • Advanced Topics
    • CLI configuration options
    • App templates
      • Build and host your own app templates
      • App template JSON format
    • The Portainer Edge Agent
    • Access control
    • Reset the admin user's password
    • Security and compliance
    • Encrypting the Portainer database
    • Using your own SSL certificate with Portainer
    • Using mTLS with Portainer
    • Stream auth and activity logs to an external provider
    • Using Portainer with reverse proxies
      • Deploying Portainer behind Traefik Proxy
      • Deploying Portainer behind nginx reverse proxy
    • How Relative Path Support works in Portainer
    • Helm chart configuration options
    • Docker roles and permissions
    • Kubernetes roles and bindings
    • Deprecated and removed features
  • API
    • Accessing the Portainer API
    • API documentation
    • API usage examples
  • Get More Help
    • Knowledge Base
    • Portainer Academy
    • YouTube
    • GitHub
    • Slack
    • Discord
    • Open a support request
  • Contribute to Portainer
    • Contribute
    • Build instructions
      • Set up a macOS build environment
      • Set up a Linux build environment
Powered by GitBook
On this page
  • Requirements
  • Generating a kubeconfig file for import
  • On-premise clusters
  • Civo
  • Akamai Connected Cloud
  • DigitalOcean
  • Microsoft Azure
  • Importing your kubeconfig

Was this helpful?

Edit on GitHub
  1. Administering Portainer
  2. Environment-related
  3. Add a new environment
  4. Add a Kubernetes environment

Import an existing Kubernetes environment

PreviousInstall Edge Agent Async on KubernetesNextAdd an ACI environment

Last updated 7 months ago

Was this helpful?

With Portainer you can import your existing Kubernetes environment through the use of a file. Portainer will use the information in the kubeconfig file to connect to your environment then deploy and configure the Portainer Agent for you.

This feature is only available in .

Requirements

While we have tried to support as many configurations as possible, there are a few requirements in order to fully support the import process:

  • Your cluster must have a load balancer configured and enabled.

  • Your kubeconfig file must specify current-context.

  • Your kubeconfig file must be self-contained (i.e., consist of only the one file with no external references).

  • Your kubeconfig file must provide cluster admin level credentials, in order for Portainer to deploy the agent on your cluster.

Generating a kubeconfig file for import

Depending on your environment, there may be different methods for creating a supported kubeconfig file. The following environment types are currently supported:

On-premise clusters

For an on-premise cluster, you can use the following kubectl command to generate a supported kubeconfig file:

kubectl config view --flatten=true --minify=true > kubeconfig.yml

Civo

To create a kubeconfig file from a Civo cluster, log into the Civo dashboard and go to Kubernetes. Select the cluster to import and click on Click to Download next to the Kubeconfig label.

Akamai Connected Cloud

To create a kubeconfig file from an Akamai Connected Cloud LKE cluster, log into the Akamai dashboard and click on Kubernetes in the left hand menu. Select the cluster to import, and in the top right of the page select Actions then Download Config.

DigitalOcean

To create a kubeconfig file from a DigitalOcean cluster, log into the DigitalOcean dashboard and in the left hand menu select Manage then Kubernetes. Alternatively, go to Projects, select the project containing your cluster, then look in the Clusters panel. Select the cluster to import, then click the Kubeconfig option to download the kubeconfig file.

Microsoft Azure

az login

This command can take a couple of minutes to complete the first time it is used, and involves a browser window opening in order to authenticate you with Azure.

Once this completes and you are authenticated, run the following command:

az aks get-credentials --resource-group [resource-group-name] --name [cluster-name] --file ./kubeconfig-azure.yml

Replace [resource-group-name] with the resource group containing your cluster. Replace [cluster-name] with your cluster.

Importing your kubeconfig

Once you have your kubeconfig file created, from the menu expand Environment-related, click Environments, then click Add environment.

Select the Kubernetes option and click Start Wizard. Then select the Import option.

Enter a name for cluster then click Select a file to browse for your kubeconfig file.

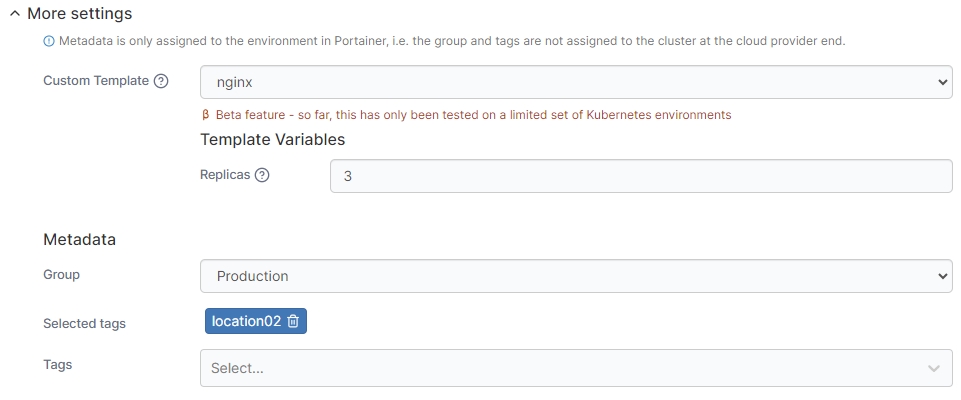
As an optional step you can expand the More settings section to customize the deployment further.

Field/Option
Overview

Custom Template

Select a custom template to deploy on your cluster. This is handy for pre-loading a new environment with your applications. The template will be deployed in the default namespace unless the template specifies a namespace to use. You can also set any variables the template requires.

Group

Tags

When you're ready, click the Connect button. If you have other environments to configure click Next to proceed, otherwise click Close to return to the list of environments where you will see the progress of your provision.

To create a kubeconfig file from an Azure cluster, download and install the from Microsoft. Start a shell session on Linux or an administrator PowerShell session on Windows, and run the following:

The import option is only available in .

Select a to add the new environment to once provisioning completes.

Select any to add to the environment.

kubeconfig
Portainer Business Edition
Azure CLI
Portainer Business Edition
group
tags