Portainer Documentation
Official WebsiteKnowledge BasePricingGet 3 Nodes of BE Free
2.21 LTS
2.21 LTS
  • Welcome
  • What's new in version 2.21
  • Release Notes
  • Getting Started
    • Introduction
    • Portainer architecture
    • Lifecycle policy
    • Requirements and prerequisites
    • Install Portainer BE
      • Set up a new Portainer BE Server installation
        • Docker Standalone
          • Install Portainer BE with Docker on Linux
          • Install Portainer BE with Docker on WSL / Docker Desktop
          • Install Portainer BE with Docker on Windows Container Service
        • Docker Swarm
          • Install Portainer BE with Docker Swarm on Linux
          • Install Portainer BE with Docker Swarm on WSL / Docker Desktop
          • Install Portainer BE with Docker Swarm on Windows Container Service
        • Kubernetes
          • Install Portainer BE on your Kubernetes environment
          • Install Portainer BE with Kubernetes on WSL / Docker Desktop
        • Initial setup
    • Install Portainer CE
      • Set up a new Portainer CE Server installation
        • Docker Standalone
          • Install Portainer CE with Docker on Linux
          • Install Portainer CE with Docker on WSL / Docker Desktop
          • Install Portainer CE with Docker on Windows Container Service
        • Docker Swarm
          • Install Portainer CE with Docker Swarm on Linux
          • Install Portainer CE with Docker Swarm on WSL / Docker Desktop
          • Install Portainer CE with Docker Swarm on Windows Container Service
        • Kubernetes
          • Install Portainer CE on your Kubernetes environment
          • Install Portainer CE with Kubernetes on WSL / Docker Desktop
        • Initial setup
    • Add an environment to an existing installation
    • Updating Portainer
      • Updating on Docker Standalone
      • Updating on Docker Swarm
      • Updating on Kubernetes
      • Updating on Nomad
      • Updating the Edge Agent
      • Updating from Portainer 1.x
      • Switching to Portainer Business Edition
        • Upgrade to Business Edition from within Portainer Community Edition
        • Docker Standalone
        • Docker Swarm
        • Kubernetes
        • Upgrading Agent-only deployments
  • Using Portainer
    • Home
      • Snapshot browsing
      • OpenAMT
    • Docker/Swarm
      • Dashboard
      • Templates
        • Application
        • Custom templates
        • Deploy a stack
        • Deploy a container
      • Stacks
        • Add a new stack
        • Inspect or edit a stack
        • Create a template from a deployed stack
        • Webhooks
        • Migrate or duplicate a stack
        • Remove a stack
      • Services
        • Add a new service
        • Configure service options
        • Scale a service
        • View the status of a service task
        • View service logs
        • Roll back a service
        • Webhooks
      • Containers
        • Add a new container
        • View a container's details
        • Inspect a container
        • Edit or duplicate a container
        • Advanced container settings
        • Webhooks
        • Attach a volume to a container
        • View container logs
        • View container statistics
        • Access a container's console
        • Change container ownership
        • Remove a container
      • Images
        • Pull an image
        • Build a new image
        • Import an image
        • Export an image
      • Networks
        • Add a new network
        • Remove a network
      • Volumes
        • Add a new volume
        • Browse a volume
        • Remove a volume
      • Configs
        • Add a new config
        • Remove a config
      • Secrets
        • Add a new secret
        • Remove a secret
      • Events
      • Host
        • Details
        • Setup
        • Registries
      • Swarm
        • Details
        • Cluster visualizer
        • Setup
        • Registries
    • Kubernetes
      • Dashboard
      • kubectl shell
      • Kubeconfig
      • Custom Templates
        • Add a new custom template
        • Edit a custom template
        • Remove a custom template
      • Namespaces
        • Add a new namespace
        • Manage a namespace
        • Manage access to a namespace
        • Remove a namespace
      • Helm
      • Applications
        • Add a new application using a form
        • Add a new application using a manifest
        • Inspect an application
        • Inspect a Helm application
        • Edit an application
        • Webhooks
        • Detach a volume from an application
        • Remove an application
      • Networking
        • Services
        • Ingresses
          • Add an Ingress manually
          • Add an Ingress using a manifest
          • Remove an Ingress
      • ConfigMaps & Secrets
        • Add a ConfigMap
        • Add a Secret
      • Volumes
        • Inspect a volume
        • Remove a volume
      • More Resources
        • Service Accounts
        • Cluster Roles
        • Roles
      • Cluster
        • Details
        • Inspect a node
        • Setup
        • Security constraints
        • Registries
    • Azure ACI
      • Dashboard
      • Container instances
        • Add a new container
        • Remove a container
    • Nomad
    • Edge Compute
      • Edge Groups
      • Edge Stacks
        • Add a new Edge Stack
      • Edge Jobs
      • Edge Configurations
      • Waiting Room
      • Edge Templates
        • Application
        • Custom
    • Account settings
  • Administering Portainer
    • User-related
      • Users
      • Add a new user
      • Turn a user into an administrator
      • Reset a user's password
      • Teams
        • Add a new team
        • Add a user to a team
      • Roles
    • Environment-related
      • Environments
      • Add a new environment
        • Add a local environment
        • Add a Docker Standalone environment
          • Install Portainer Agent on Docker Standalone
          • Connect to the Docker API
          • Connect to the Docker Socket
          • Install Edge Agent Standard on Docker Standalone
          • Install Edge Agent Async on Docker Standalone
        • Add a Docker Swarm environment
          • Install Portainer Agent on Docker Swarm
          • Connect to the Docker API
          • Connect to the Docker Socket
          • Install Edge Agent Standard on Docker Swarm
          • Install Edge Agent Async on Docker Swarm
        • Add a Kubernetes environment
          • Install Portainer Agent on your Kubernetes environment
          • Install Edge Agent Standard on Kubernetes
          • Install Edge Agent Async on Kubernetes
          • Import an existing Kubernetes environment
        • Add an ACI environment
        • Add a Nomad environment
        • Provision KaaS Cluster
          • Civo
          • Akamai Connected Cloud
          • DigitalOcean
          • Google Cloud
          • AWS
          • Azure
        • Create a Kubernetes cluster
          • MicroK8s
            • Offline installation
        • Add an environment via the Portainer API
      • Auto onboarding
      • Groups
      • Tags
      • Manage access to environments
      • Manage access to environment groups
      • Update & Rollback
    • Registries
      • Add a new registry
        • Add a DockerHub account
        • Add an AWS ECR registry
        • Add a Quay.io registry
        • Add a ProGet registry
        • Add an Azure registry
        • Add a Gitlab registry
        • Add a GitHub registry
        • Add a custom registry
      • Browse a registry
      • Manage a registry
    • Licenses
    • Logs
      • Authentication
      • Activity
    • Notifications
    • Settings
      • General
      • Authentication
        • Authenticate via LDAP
        • Authenticate via Active Directory
        • Authenticate via OAuth
      • Shared credentials
        • Add Civo credentials
        • Add Akamai Connected Cloud credentials
        • Add DigitalOcean credentials
        • Add Google Cloud credentials
        • Add AWS credentials
        • Add Azure credentials
        • Add SSH credentials
      • Edge Compute
  • Frequently Asked Questions
    • Portainer Concepts
    • Installing
    • Upgrading
    • Troubleshooting
    • Contributing
  • Advanced Topics
    • CLI configuration options
    • App templates
      • Build and host your own app templates
      • App template JSON format
    • The Portainer Edge Agent
    • Access control
    • Reset the admin user's password
    • Security and compliance
    • Encrypting the Portainer database
    • Using your own SSL certificate with Portainer
    • Using mTLS with Portainer
    • Stream auth and activity logs to an external provider
    • Using Portainer with reverse proxies
      • Deploying Portainer behind Traefik Proxy
      • Deploying Portainer behind nginx reverse proxy
    • How Relative Path Support works in Portainer
    • Helm chart configuration options
    • Docker roles and permissions
    • Kubernetes roles and bindings
    • Deprecated and removed features
  • API
    • Accessing the Portainer API
    • API documentation
    • API usage examples
  • Get More Help
    • Knowledge Base
    • Portainer Academy
    • YouTube
    • GitHub
    • Slack
    • Discord
    • Open a support request
  • Contribute to Portainer
    • Contribute
    • Build instructions
      • Set up a macOS build environment
      • Set up a Linux build environment
Powered by GitBook
On this page
  • Creating a new user
  • Creating an access token
  • Using your access token

Was this helpful?

Edit on GitHub
  1. API

Accessing the Portainer API

PreviousDeprecated and removed featuresNextAPI documentation

Was this helpful?

To access the Portainer API, you will need a few things:

  • A user in Portainer

  • An access token for that user

  • The ability to make HTTPS requests to the Portainer server on port 9443 (or 9000 for legacy HTTP)

Creating a new user

API access is provided on a per-user basis, with each users' API access dependent on that user's permissions within Portainer. For example, if your user had access to only one environment, API calls for that user would also be restricted to that environment.

To create a new user within Portainer, refer to our documentation:

Once the user has been created, log in to Portainer as that user to create an API access token.

Creating an access token

Once the user has been created, you can add an access token to that user. The access token will provide the same level of access to Portainer functionality as would be available to that user had they logged into the Portainer UI.

Once logged in as the user, click on your username in the top right and then select My account.

Scroll down to the Access tokens section. Here you can see any access tokens that exist for the user.

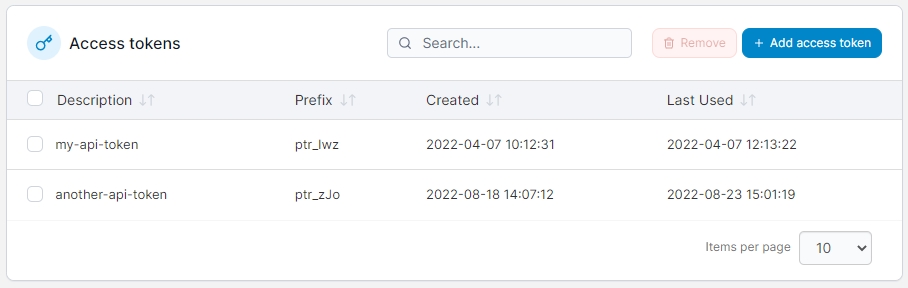
To add a new access token, click the Add access token button. You will be taken to a new page where you can set a Description for your access token. We recommend making this something recognizable for future reference.

For security we require you to re-enter your password when creating an access token.

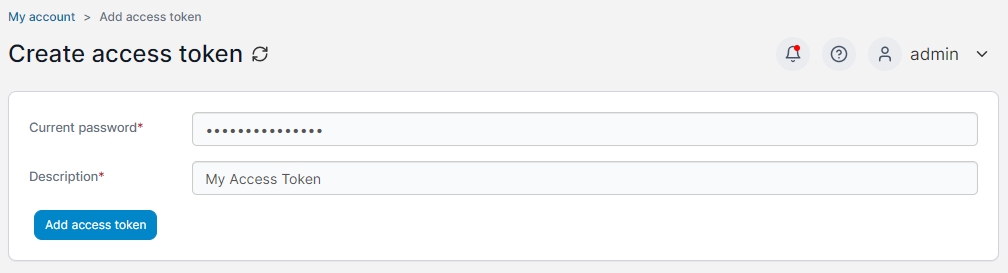
Once you have provided a description, click the Add access token button to generate your access token.

Your new access token will now be displayed. Please copy the access token and keep it in a safe place, as you will not be able to view the token again after creation.

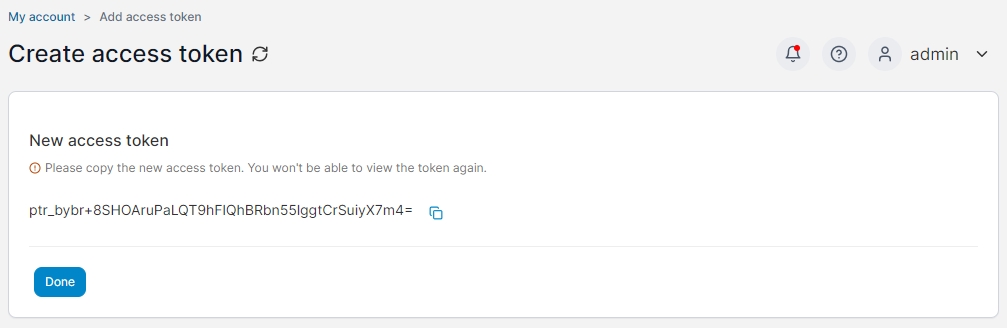
When you have copied the access token, click the Done button to return to the User settings page. Your access token is ready to use.

Using your access token

Now that you have created a user and access token, you are ready to access the API. The Portainer API follows the RESTful architecture, accepting GET / POST / PUT / DELETE requests and responding with JSON objects.

To make an API request, you will need to include your access token in the X-API-Key header to authenticate your request. For example, you can use the /stacks endpoint to list the stacks you have access to:

http GET https://portainer-url:9443/api/stacks X-API-Key:your_api_key_here

This will return a JSON object listing your stacks:

[
    {
        "AdditionalFiles": null,
        "AutoUpdate": null,
        "CreatedBy": "admin",
        "CreationDate": 1631852794,
        "EndpointId": 4,
        "EntryPoint": "docker-compose.yml",
        "Env": null,
        "GitConfig": {
            "Authentication": null,
            "ConfigFilePath": "docker-compose.yml",
            "ConfigHash": "2e71920bf1ee1bbac976d320f8f274411fba3bad",
            "ReferenceName": "refs/heads/master",
            "URL": "https://github.com/mygithubaccount/wordpress-stack"
        },
        "Id": 5,
        "IsComposeFormat": true,
        "Name": "",
        "Namespace": "my-namespace",
        "ProjectPath": "/data/compose/5",
        "ResourceControl": null,
        "Status": 1,
        "SwarmId": "",
        "Type": 3,
        "UpdateDate": 0,
        "UpdatedBy": ""
    },
]

If a user tries to access an area they do not have permission to access, an error message will be returned. For example, assume that a non-administrator user attempted to access the /settings endpoint, which requires administrator access:

http GET https://portainer:9443/api/settings X-API-Key:your_api_key_here

The user would be presented with the following response:

{
    "details": "Unauthorized",
    "message": "Access denied"
}

The following examples use to execute API calls against Portainer. Feel free to replace this with your method of choice.

Now that you have access to the Portainer API, you can learn more about how to use it from the and our .

httpie
API documentation
usage examples
Add a new user